Categories

Blog

Your browser is out of date

This website will not look or function as originally intended in your current browser

We recommend upgrading to the latest version of Internet Explorer or Chrome or Firefox

    Storage solutions for a stylish, clutter-free home.

    September 29, 2023 by emily.bailey

    Friday, September 29, 2023

    Stylish storage | Schlage

    If you are looking for a quick, easy cost-effective way to organize your space, these stylish storage solutions are the perfect place to start.


    READ MORE

    There is nothing quite like the satisfaction of stepping into a clean, well-organized space. But when clutter starts piling up, it can quickly turn into a chaotic display of excess belongings and disorder. If you are looking for a quick, easy cost-effective way to organize your space, these stylish storage solutions are the perfect place to start.  
    Stylish organized minimalist shelving unit with baskets, boxes, eucalyptus.

    Evaluate your storage needs

    Before diving into the mission of organizing your living space, it’s crucial to take a step back and evaluate your storage needs. Pinpoint the areas in your home that are most cluttered and in need of attention. Focusing your efforts on these specific trouble spots is key because attempting to tackle multiple rooms at a time can hinder your ability to gauge progress and create unwanted stress. By taking it one room at a time, you’ll not only streamline your efforts but also witness the transformation of each space into a haven of tranquility and style.

    Woman using woven basekts to organize linen closet.

    Transforming chaos into chic order

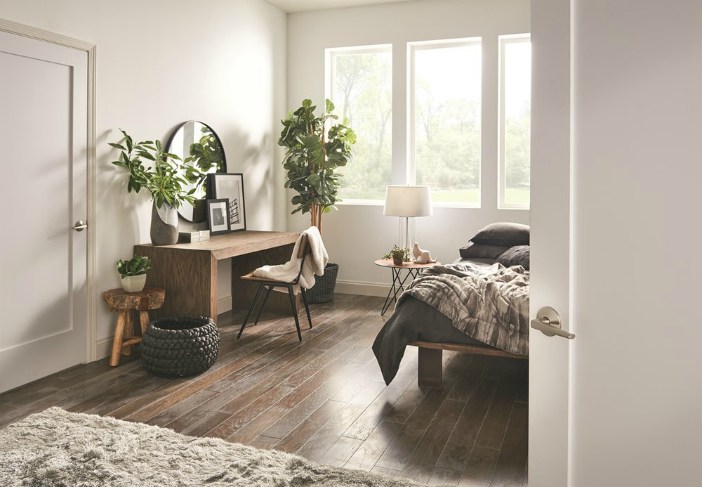
    Whether you live in a small apartment or a spacious home, these home storage solutions offer inspiration to transform your space while enhancing organization and style. These ideas are versatile and adaptable, so get creative and have fun watching your space go from dissaray to organized style.
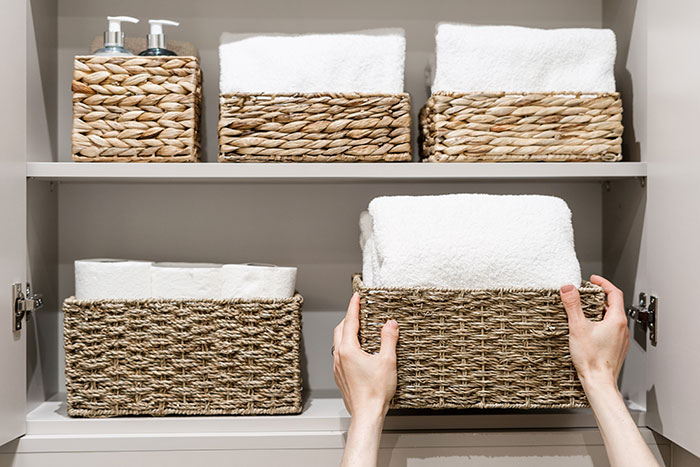
    Baskets

    One way to add both functionality and charm to your home is by using baskets. These versatile storage options come in all shapes, sizes, and materials, allowing you to find the perfect fit for any room. Whether you use them to store blankets, toys, shoes, or even just as decorative accents, baskets are a great way to keep things organized while adding a touch of visual appeal. 


    If your hallways and entryways are always scattered with shoes and toys, try adding a basket under a console table like Living Spaces for a quiet, yet flattering way to store your items. 
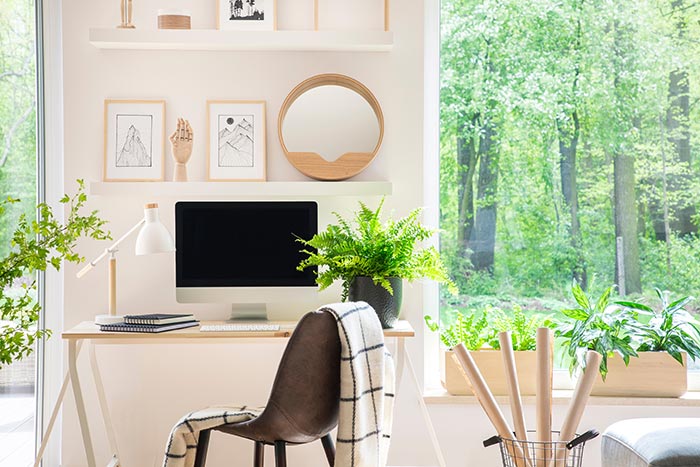
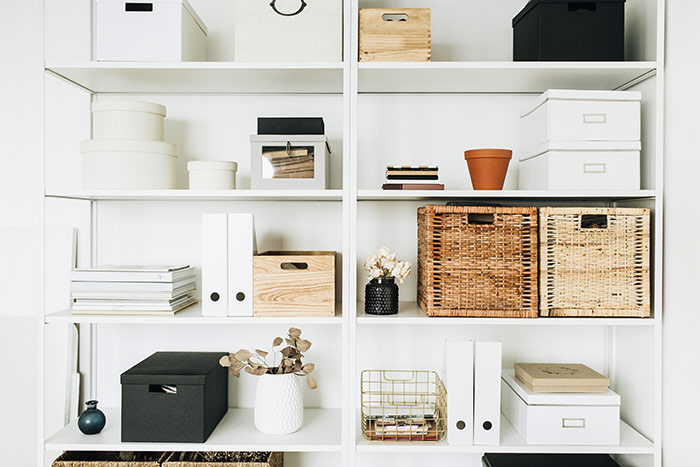
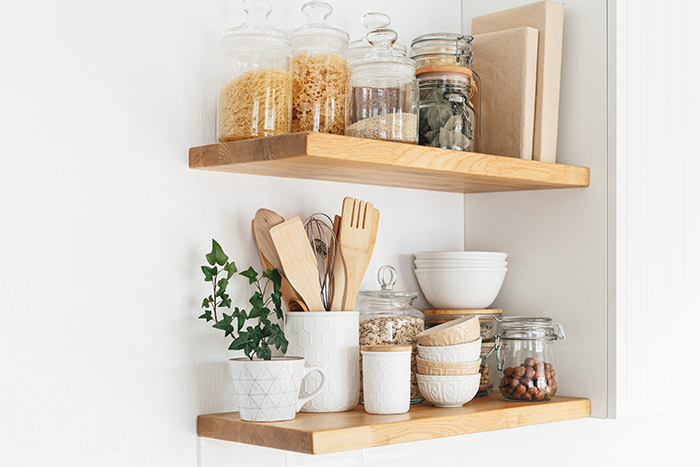
    Open shelving

    If you’re looking to showcase your favorite items while reducing visual clutter, open shelving is the way to go. By removing the doors from your cabinets or investing in floating shelves, you can create a stylish display for your books, décor, and other belongings. Not only does this make your space feel more open, but it also encourages you to keep things tidy and organized. 


    Bathrooms are high traffic areas where organization is key, and clutter can accumulate quickly. One effective solution we love is incorporating narrow shelves, like these featured on Good Housekeeping. These space-saving shelves provide a practical yet stylish way to keep everyday items neatly stored.

    Open kitchen shelves storing dishes, utensils and books.

    Utilizing architectural features

    Take advantage of the existing architectural features in your home to maximize storage space. Nooks and alcoves are perfect opportunities to create functional storage solutions that seamlessly blend with your home’s design. Whether it’s a built-in bookshelf, a cozy reading nook with hidden storage, or an alcove transformed into a mini home office, these features can be both practical and aesthetically pleasing. 

    Functional furniture

    Why settle for ordinary furniture when you can have pieces that offer both style and storage? Functional furniture with built in storage is a game-changer when it comes to removing visual clutter from your home. From ottomans with hidden compartments to coffee tables with drawers, these pieces allow you to keep your space tidy while adding a touch of sophistication to your décor.


    Whether it is adding a touch of style by installing new shelf or decluttering a corner with the help of a basket, each organizational effort contributes to the overarching goal of turning your living space into a cleaner, stylish and more organized space. The path to a serene and stylish home isn’t about the scale of the task, but rather the intent and dedication behind it. With each storage solution you implement you’re taking strides towards creating the clutter-free home you’ve always envisioned. 

    While the options above only scratch the surface of the many stylish storage solutions you can incorporate in your home, we hope they inspire you to make a small step towards creating a stylish and clutter-free home. For all things home improvement and DIY, check out the Schlage blog, Instagram and Pinterest!


    Guide to dutch doors on a budget.

    August 29, 2023 by emily.bailey

    Tuesday, August 29, 2023

    Dutch doors | Schlage

    If you want to add a dutch door to your home while keeping your project on budget, we can help you achieve the look for less!


    READ MORE

    It's no surprise that dutch doors are a popular design choice for traditional and modern styles alike. Dating back to the 17th century, these doors are certainly not new but homeowners that value casual style are embracing this trend all over again. They offer a charming way to add a little more character to your home while maintaining utility and providing lots of value. If you want to add a dutch door to your home while keeping your project on budget, we can help you achieve the look for less! Before we get to our favorite dutch door DIYs, let’s learn a little more about dutch doors themselves.
    Happy couple standing at open dutch door.

    What is a dutch door?

    Dutch doors are essentially a single door that is split in the middle to allow the top half to open while the bottom half remains shut. They are secured together with a latch that allows homeowners to keep the door as one when needed. They typically feature a standard door knob or lever on the bottom half and can house a deadbolt on the top half when used as an exterior door when more security is needed.

    What is the purpose of dutch doors?

    Now that dutch doors have made a comeback, you’ll spot them replacing ordinary doors everywhere. From front doors to garden sheds and even inside homes, dutch doors can provide many benefits no matter what space you choose to put them in.

    Cottage style black dutch door with brass door handle.

    Character and Style

    With their distinctive design and timeless appeal, dutch doors can instantly elevate the aesthetic of any home. Whether you have a traditional or modern style, they add the perfect touch of character and personality to set your space apart. It is a small detail that leaves a lasting impression on anyone who enters your home.

    Let in fresh air

    One of the major benefits of dutch doors is the ability to let fresh air into your home while keeping pets and children safely inside. By opening the top half of the door, you can enjoy a gentle breeze without compromising security or risking any unwanted critters sneaking into your home.

    Enhanced interaction 

    Whether you are chatting with your neighbors, receiving packages, or wanting to keep an eye on the kids playing outside, the divided opening allows for seamless conversations and improved communication. It is the perfect way to create a welcoming atmosphere and foster communication with those outside your home.

    Customizable for your needs 

    Dutch doors can be easily customized to suit your individual preferences. If you value added privacy, you can opt for dutch doors with windowpanes or a solid top half. They can also serve various purposes, such as keeping pets safely contained or replacing unsightly baby gates. With dutch doors, you have the flexibility to personalize your space while maintaining functionality and style.

    How to DIY a dutch door

    Taking an existing interior door and adding a little DIY sweat and skill is a great way to save several hundred dollars. HGTV put together a thorough tutorialfor this interior upgrade to help you get the look and functionality for way less. Below are a few more of our favorite dutch door projects to inspire you.

    Teal blue dutch door on ivory brick home with satin brass handleset.

    Exterior dutch door

    Just like with interior doors, you can take an existing front door and give it new life as a dutch door. Would you believe this project from This Old House only cost $63 to complete?! By adding a few details where the door is halved, you can keep this project from looking like you just...you know...sliced a door in half.


    Juniper Home turned a standard door into a beautiful backyard feature. It’s as stunning from the kitchen inside as it is from the patio outside. We’re probably a bit biased, but thoseSchlage® Siena door knobs really help complete the look, too.

    Split doors for sheds

    A gardening shed, backyard office or other ADU could be the perfect place for you to install a dutch door. Because these sheds often don’t have A/C, natural air flow is important. Nitty Gritty Dirt Man now has somewhere he can store his tools and work in comfort.


    When Twelve on Main built their own greenhouse, they included a dutch door for the same reasons.

    Dutch…or French?...doors

    If one is nice, two must be even better, right? Double dutch doors make a striking entrance. With these examples from Rasmusen Painting and Design and Houzz, you can easily see how a pair of dutch doors works for different styles of homes, from modern farmhouse to coastal cool.

    DIY dutch barn door

    Feeling like putting your carpentry skills to use? Check out this DIY from Remodelaholic and get all the steps you need to create your own rustic, dutch barn door.

    Dutch doors with details

    Don't forget the charming shelf on the lower half of your dutch door. Get all the tips and tricks from Skaie of HomeJelly. If this is a project you'd rather not DIY, she has wonderful advice for working with a professional (and still saving a little dough!).


    Shelves are traditional for half doors, but there’s no reason you should stop there. Add windows or frosted glass, faux paneling or shiplap. Nearly any of these budget-friendly ideas for a hollow core door upgrade would work, especially on an interior dutch door. And if you have an arch-topped door? Embrace the architectural detail and highlight it with a round dutch door like we see in this example from Southern Studio.

    Screens with style

    If the fear of bugs and other unwanted pests are keeping you from your dutch door dreams, consider adding a retractable screen. They are often secured by magnets and can retract from top to bottom or side-to-side for taller doors. When not in use, they are inconspicuous enough to not detract from the look of your dutch door, unlike most bulky screen doors.


    This next one might not be the kind of screen you were expecting, but if you’re a pet owner, you know it’s a great dutch door design idea. Try installing a screen on the bottom half of your door like Rustica . That way, dogs can still see you through the pet screen even if you’ve had to put them in a mudroom or other area while you’re busy. Now you can make dinner without your pup getting underfoot or stressing out because you aren’t together.

    Creative paint jobs

    Don't be afraid to get a little creative with your paint choice for your dutch doors. Consider painting the exterior a different color to add an interesting pop when the door swings inward like we see in this example from House Beautiful. This can be a great way to create a cohesive look between two spaces as you consider a shade that complements both.

    Dutch door locks

    The split nature of the door is usually the main attraction when you decide to make your own dutch door. Even though you can open the top to let in the light and breeze, you still need to be able to secure your home. Choosing the right door hardware for your dutch door is vital. In Home Depot’s DIY dutch door tutorial, they installed the Schlage Encode™ Smart WiFi Deadbolt (and then apparently had pie). What’s not to love!

    Just as you would with any door hardware, choose a style and finish that perfectly complements the rest of the home. Dutch doors might trend on the traditional side of architecture, but hardware is an easy way to give it a more modern update like we see with this bold yellow door and dark handleset.


    There are so many great reasons to consider dutch doors for your home. Find everything you need for these DIY projects and more at the Schlage blog and Pinterest.


    How to choose a front door paint color.

    July 05, 2023 by emily.bailey

    Wednesday, July 5, 2023

    sky blue craftsman front door

    Follow these tips to make choosing the right front door paint color simple and easy.


    READ MORE

    Choosing a paint color for your front door is often easier said than done. With so many options available, the process of narrowing down your choices can be overwhelming. One thing's for sure, at the end of the day, the color you choose should be a reflection of your personal style.


    The good news is that there are a number of tips for choosing an exterior paint color. Many of the same tricks can be used for choosing your front door color, but here are some additional things to consider.

    Sky blue crafstmand front door with a Schlage Encode smart wifi deadbolt.

    Should you choose a neutral or colorful paint for your front door?

    How adventurous you want to be with your front door paint color is entirely up to you. There are pros and cons of each. Neutral colors are more classic, and classic colors have more longevity. In other words, you might love that lime door now, but what about in a year? A more neutral shade like Hunter green or sage might be the safer choice.


    Neutral colors, because they are … well, neutral … complement a wider range of exterior paint colors. If you’re worried about your door matching the rest of the outside of your house, go neutral.  Don’t be fooled into thinking this means only black, white, brown and grey, though. Include slate blue, earthy greens and even some reds such as terra cotta.


    The upsides of a bold color like coral or canary yellow is that they are often cheerier and make a stronger welcoming statement to guests. Relatively speaking, your front door is also small real estate. Painting it a striking color won’t feel as overwhelming as if you painted your entire exterior in that hue. A grape front door? Beautiful and unique, yet restrained. Grape siding everywhere? That’s probably a bit much.


    There are two schools of thought for what you should paint your front door when you’re selling your house. On one hand, a neutral color will appeal to a wider range of prospective buyers. A study by Zillow found that, compared to other colors, black doors can get about $6,000 for your home at resale. On the other hand, a bold color will help your home stick out in buyers’ minds when they’ve been viewing multiple properties. Just make sure it sticks out for the right reasons.
     

    Consider complementary colors.

    We hinted at this already. When choosing a front door color, make sure it goes with the other hues on your home. That doesn’t mean you have to match them exactly, though. Deep contrast, such as with a bright blue door on a white home, can be especially attractive. Consider how a new door color will go with trim, window shutters and a screen door as well as the home’s overall exterior.


    Many paint companies create complementary color palettes on their websites. Try picking a color that matches your home’s exterior and see which hues they suggest to match.


    Play up your curb appeal.

    A refreshed front door can do wonders for your curb appeal, but only if your new color works well with the landscaping and hardscaping you already have. Some color experts shy away from green front doors because of the amount of green we typically have in our gardens. Similarly, you might not want a red door if it clashes with the brick pavers. Navy blue might be the better choice in that case.


    Consider door hardware finishes at this stage, too. If you have existing hardware you plan to keep, choose a paint color that complements that finish. For example, Matte Black often looks great with bold yellows, while Satin Nickel is ideal for darker blues. 
     

    Test it outside.

    Once you think you’ve found a good match, go look at it outside. If you can get a large swatch to take home, tape it to your front door and see how it looks at different times of day. What looks beautiful in the bright morning sun might look dull at dusk. What was gorgeous in the store could look less enticing in the sunlight. And on the flip side, what you were unsure of in the store might turn out to be perfect once you get out from under the florescent lighting.


    This is a good time to consider how bright your porch is, too. If you have a covered patio, that will affect how bright the front door color seems. A darker color could feel overbearing in the shade of a porch.
     

    Send the right message.

    Your front door makes a first impression on every guest who enters, whether it’s a longtime friend or a prospective homebuyer. You can use this as an opportunity to set the tone for what they’ll find inside. If your interior décor is filled with bright colors, pick a front door paint color that’s also uplifting and happy. If you lean toward monochromatic minimalism, your front door should reflect that as well. More of a Mid-Century Modern fan? That style has some characteristic colors – mustard, turquoise, chocolatey brown – so you can start to tease the aesthetic from the first step.
     

    Choose the right kind of paint.

    Because your door is obviously outdoors and exposed to the elements, direct sun and possibly kicking, scratching and daily life, you need to choose a durable paint. First, make sure it’s labeled for exterior use. Next, research which type of paint – water- or oil-based – is right for your door. This depends on your door material. Metal doors need an oil-based paint, while fiberglass doors need a water-based, or latex, paint. Wood doors are a little tricker since the type of wood will dictate the type of paint.


    The next thing you need to think about when buying paint is the finish. For a front door, choose semi-gloss. This finish is more wear- and stain-resistant than some of the others and is also easier to clean.


    The opportunities are endless when it comes to painting your front door, but don’t let that scare you off. Have fun with it, whether with color, wreaths and other décor, hardware or all of the above. Once you’ve selected the best color for you, use these easy tips for how to paint a door.


    How to add decorative details and character to your front porch.

    June 30, 2023 by emily.bailey

    Friday, June 30, 2023

    Southern front porch

    With all the activity – fireworks, parties, pool fun – it can get a little overwhelming and scary for your furry friends. Here are nine ways to keep your pet safe on the Fourth of July.


    READ MORE

    Taking your curb appeal from blah to beautiful can feel overwhelming. From landscaping and porch pots to front door design, hardware, and paint colors, there are so many ways to make the front of your home more welcoming and unique. One option you may not have considered to boost the character of your home is to add architectural details that give your home a custom feel. Browse our favorite options below to see what decorative details you can DIY to add character to your front porch. 
    Southern front porch with cozy seats and planted flowers.

    Columns

    Many homes come with standard 4x4 or 6x6 front porch columns that can easily be upgraded according to your style preferences. Wrapping your existing front porch posts with larger boards or PVC column wraps (available for purchase at most building supply retailers) can give your whole porch a more solid and custom look. We love @ispydiy’s natural wood-stained front porch columns for a modern rustic aesthetic – so homey!
     

    Corbels

    One easy DIY idea for increasing the architectural interest of your front porch is to add corbels. These decorative supports come in a variety of unique styles and shapes and serve as a point of interest to draw the eye. When adding corbels to an existing structure like the interior corner between a porch post and roof beam, make sure to choose a size that looks functional, even if it is purely decorative. For example, the corbels on @jennasuedesign’s porch add the perfect touch of adornment to complement the overall porch style.
     

    Bracket

    Brackets are very similar to corbels, though they tend to be less ornate and more functional. These brackets on the @hgtv 2019 Dream Home serve an important structural purpose while also adding visual impact. You can purchase and install decorative brackets to give a more solid and stylish look to porch ceilings, gables, doorways, columns, and porches.
     

    Crow’s Feet

    Crows’ feet are decorative supports used at the peak of a gable end. This architectural detail tends to lend a sense of rustic elegance to a home’s exterior. If you have gable ends at the front of your home, consider adding crow’s feet for a special touch of visual appeal.

    Trellis or Plant Wall

    This project is perfect for the plant enthusiast or anyone looking to add a sense of organic charm to the front of their house. A trellis is a flat frame typically made of metal or wood that provides a vertical support for climbing plants. While certainly a functional gardening feature, a trellis can also make an architectural statement to the front of your home – pick a larger trellis in a contrasting color to layer over a front wall or add privacy by using a trellis to frame out the end of a porch or to create a seating area. Similarly, a plant wall is a creative way to add planting space and beauty to an exterior wall. This simple plant wall from @ispydiy is a fun focal point that coordinates effortlessly with the home’s aesthetic.
     

    Pergola

    If you are looking for a cost-effective and relatively easy way to add a front porch to your home, a front porch pergola is the perfect solution. While typically thought of as a structure for a garden or back deck, a front pergola can transform your curb appeal and provide partial shade for a relaxing outdoor seating area.

    Railing

    Upgrading your existing front porch with a railing is a lovely idea for intentionally framing your space. These clean railings from @courtney.tracy are a quaint farmhouse touch that help make her front porch more cozy and pleasant. For a completely different railing style, check out the traditional iron railing from @babybently18 – we love how it provides stability, ease and elegance to a simple front porch.
     

    Shutters

    For a classic home front that never goes out of style, shutters are an obvious choice. They can add character and color to enhance your home with subtle appeal. If you already have shutters, but they are looking a tad drab, it’s time for an easy refresh. A quick scrub down or pressure wash will likely do the trick – or go for a more impactful update by painting your shutters in a fresh hue. To take the upgrade a step further, consider painting your front door trim to coordinate with your shutters like @cuckoo4design – what a charming look!
     

    Front Door Casing

    Adding more intricate and robust casing trim around your front door is an often-overlooked way to layer some personality into the front of your home. This front door from @bleaktochicohio is a perfect example of how decorative casing can elevate your front porch style. For even more drama, paint your front door casing in a contrasting color from your front door. @porchdaydreamer nails this look with bright trim framing an elegant dark door.
     

    We hope these ideas spark some fun DIY projects you can tackle to easily add detail and character to your front porch. For more DIY home tips and design ideas, browse our blog, Pinterest, and Instagram!


    Say “hello” to better vacation rental business.

    June 21, 2023 by emily.bailey

    Wednesday, June 21, 2023

    Vacation rental check in tips | Schlage

    Guests who feel welcome tend to become repeat rental customers, something that you, as a property manager, need to succeed on Airbnb and VRBO.


    READ MORE

    Guests who feel welcome tend to become repeat rental customers, something that you, as a property manager, need to succeed on Airbnb and VRBO. And how do you provide an experience that converts customers and earns positive reviews? Show that you go the extra mile for your guests’ comfort: Pay attention to the details and make their stay simple and convenient.
    Handing over keys to vacation rental.

    Your “hello” matters

    Welcoming your guests properly starts before they even set foot on your property. When you’re in communication with them before their visit, don’t rely on automated emails. A personalized touch, not to mention replying to questions quickly, makes a statement about how much you respect their business and how you’ll handle problems that may come up.


    Hostfully also recommends getting to know your guests before their arrival. Find out why they’re staying with you – a girls’ wine tour, a family reunion, an anniversary getaway – and what they’re interested in. Then give a local gift or a welcome basket based on that insight. Maybe treat them to a local bottle of vino or a bouquet of roses to set the romantic mood. Even if you don’t provide a customized gift, still consider fresh flowers or a thoughtful gift from the region to make them feel like family.


    At Schlage, we love a beautiful entryway you can’t take your eyes off, but Hostfully makes a good point about not having conversations in the doorway. If you’re on site when your guests arrive, let them into the house and give them a chance to set down their bags. Offer them some water and let them catch their breath. Only then do you want to begin your welcome speech with all the essential information about staying with you.


    As part of the full welcome package, include an information book, either emailed ahead of time or provided on the property. Anticipate their needs with instructions on how to adjust the thermostat and connect to the WiFi, and offer expert suggestions on the best dining and local tourist highlights. If you’ve installed a Schlage smart lock, include our tip sheets in case they have questions about how to use it.


    You should also include policies about how to treat the property (it helps protect your investment) and a list of emergency contact information. Include your own phone number and email as well as details for local police, fire departments and hospitals.

    A welcoming – and secure – statement

    If you can’t be there when your guests arrive, either because you have other commitments or the vacation home is in another state, you can still welcome customers so they don’t feel like an afterthought. One way is by installing a smart lock. With all the advantages of keyless convenience, these locks remove many of the hassles of checking in and allow visitors to come and go as they please. That simplicity is the welcoming statement that separates you from the competition.


    Access codes are the … *ahem* key … to providing ease and convenience to your guests. When you send visitors their unique code before they arrive, they’ll have access to the home without your needing to arrange a key exchange. Providing the code in advance doesn’t mean they’ll have immediate access – unless you want them to. If check-in time isn’t until noon because of cleaning, for instance, you can schedule those codes to be activated only when you know the house will be ready.


    Not being tied to the property to provide a key at a specific time can actually boost your business, particularly with certain kinds of guests. VRBO names flexible check-in times as one way to attract weekenders. They’re only staying for a short time, so don’t delay their fun by making them wait on the porch.


    Because you can create multiple access codes, you can save some specifically for guests, have a different code for your house cleaner and another one entirely for trusted maintenance teams. You can also view a history log through the Schlage Home app to see when codes have been used, so you can be confident that your handyman arrived to fix the toilet or that guests checked out as expected.


    When guests are done staying with you, you don’t want them to have access to the rental property anymore. You can schedule access codes to expire at the end of their visit so they can’t return unannounced. And because you never provided a key, you know they didn’t make a copy before they left.


    Try our Get Help Deciding Tool to find out which Schlage smart lock is right for your vacation home. Check out the features of the Schlage Home app as well – compatible with the Schlage Encode™ family of WiFi smart locks and see how creating and managing access codes, checking your locks’ status and more from your smartphone can make your job easier and your property more secure.


    Looking for more ways to boost your vacation rental business with a welcoming statement? Check out this Schlage blog for simple ways to improve your property’s curb appeal.


    6 ways to start rainscaping for water conservation.

    May 26, 2023 by emily.bailey

    Tuesday, May 30, 2023

    Rainscape ideas | Schlage

    One important element of a more sustainable yard is water conservation. Here are some helpful tips you can use to reduce the ecological footprint of your yard with a rainscape.


    READ MORE

    With spring officially here and summer close behind, lawn and garden projects are in full swing. Whether you’re revamping your landscaping or working on your lawn, now is the time to think through how your yard can positively impact the environment. One important element of a more sustainable yard is water conservation. Below, we provide some helpful tips you can use to reduce the ecological footprint of your yard.
    Rainscape ideas with rain barrel collecting rain water.

    What is a rainscape?

    A rainscape is simply landscaping that is intentionally designed to conserve water and protect water quality. Rainscaping helps reduce stormwater runoff from your property by putting it to work in more productive ways. There are many options for implementing rainscaping into your residential property – while you might not be able to make all these changes at once, it’s never too late to get started by choosing one project to make your yard more eco-friendly.

    1. Add rain gardens

    Rain gardens are a fun DIY rainscaping addition to your yard that helps collect and purify rainwater rather than allowing it to pick up chemicals and pollutants as it flows on a straight path to the sewer system. The best spot for a rain garden will depend on your yard – the next time it storms, look out the window to see where rainwater runoff exists. Often, water runoff travels down hardscaping like driveways and decks or builds at the end of downspouts. By diverting this runoff with a pipe or path of river rock to a shallow depression at least 10ft from your house, you can easily create a rain garden that has an added benefit of protecting your home’s foundation from pooling water. Learn how to build a rain garden here.

    2. Harvest rainwater

    One of the easiest rainscaping ideas to use at your home is to collect rainwater runoff from a roof or other surface. By channeling your downspouts to stormwater runoff rain barrels, you can store rainwater to replace a large amount of your water needs. This environmentally responsible choice gives you more control over your organic water supply and can add up to significant cost savings, especially if you are paying for city water for landscaping needs.

    3. Landscape without water

    Landscaping for your location can be tricky, especially if you live in a dry climate where plants can require a lot of supplemental water to survive. No-water and low-water landscaping allows you to rainscape even if your location doesn’t see much rainfall because you are intentionally conserving water. The first step is to choose plants that can tolerate drought – looking up a list of plants native to your state or region is the easiest place to start. Its also important to think about the density of plants in a landscaping bed. When plants are permitted to run up to one another, the soil is shaded from heat and sun, preventing moisture from evaporating too quickly.

    Backyard rainscape with rain barrel garden shed and potted plants.

    4. Make your lawn drought tolerant

    To survive dry spells, your lawn needs a deep root system. While it is tempting to run a sprinkler on a consistent schedule or at the first sign of any wilting grass, it is better to wait to water your lawn when closer to 50 percent of the grass is wilting. Once these conditions are met, you want to give your lawn a thorough soak of 1/2-3/4 inches, but make sure to stop before creating any wasteful run-off. By giving your grass a long watering only when it absolutely needs it, you are helping establish a deep root system that will develop more and more drought tolerance and require less and less watering.


    Another management tip to motivate your grass to develop deep roots is to never mow grass shorter than its highest recommended height. Longer blades of grass have more surface area to photosynthesize and store energy to endure drought. If these methods don’t work and you still find yourself having to frequently water your lawn, it might be time to reduce the amount of turf in your yard. Native gardens and groundcovers are a more sustainable use of your property, and there are lots of creative ways to reduce lawn space in a way that is beautiful and appealing from the curb.

    5. Create a rain swale

    Water that quickly runs over the surface of your yard or driveway on its way to the sewer collects pollutants rather than benefitting the ecology. Rain swales are a rainscaping tool that slows water down and spreads water out, giving it a chance to actually sink into the soil. You can create a rain swale by digging a shallow ditch where water runoff typically builds in your yard. Line the depression with material like gravel, native plants and mulch that will help filter water. Rain swales can be a fascinating focal point for your yard that creates year-round aesthetic interest.

    6. Move to permeable pavement

    You’ve likely noticed a rainscaping theme: reduce rainwater runoff. Impervious pavement like cement and blacktop are the most common surfaces for residential driveways, patios and sidewalks, but they act as a slide that moves valuable rainwater away from the soil and into the sewer. If you are adding or replacing any hard surfaces outside your home, look for porous, permeable options that filter rain runoff into the soil beneath. For example, a patio with a sub-base of gravel and topped with permeable pavers is a much more eco-friendly option than pouring an impervious concrete slab.

    While the options above only scratch the surface of the many ways to add rainscaping features that conserve water outdoors, we hope they inspire you to make a small step towards a more environmentally friendly landscape. For all things home improvement and DIY, check out the Schlage blog, Instagram and Pinterest!


    Sustainable container garden ideas for your front door.

    May 12, 2023 by emily.bailey

    Friday, May 12, 2023

    Container garden ideas | Schlage

    A little intentionality and knowledge can go a long way in making your front porch a welcoming place for human guests as well as the birds, bees and butterflies that balance your ecosystem.


    READ MORE

    A quick front porch makeover is an easy way to boost your curb appeal – but what if you could update your front porch in a way that benefits the environment and looks beautiful? Enter front porch container gardens. No matter how much space or effort you can commit, container gardens are a fun way to add value to your front porch. A little intentionality and knowledge can go a long way in making your front porch a welcoming place for human guests as well as the birds, bees and butterflies that balance your ecosystem.


    Use the following steps to assemble a container garden both you and your environment can enjoy!

    Man filling flower pot with potting soil.

    1. Plan your front porch container garden

    Start by taking a quick inventory of your front porch space and the amount of time you are willing to put into your container garden. Even one small, simple plant pot can add visual interest and environmental value. Then, decide what is most important to you when it comes to your container garden – do you want color? a variety of plants and textures? are there particular critters you are wanting to attract (or ward off)? Once you have a general idea of what you want, it’s time to pick the perfect containers and plants to suit your vision. When picking plants, be sure to pay attention to what kind of soil, drainage, watering and sun each variety requires to ensure your chosen plants can thrive in your specific front porch conditions.

    How to choose plants for your container garden that help the environment

    The easiest way to know your container garden is helping the environment is to choose native plants. Native plants are those that occur naturally in your area without human introduction. In contrast, exotic plants that were brought into your region from distant areas are less likely to support the wildlife in your ecosystem and may even be invasive, causing harm by taking over natural habitats and choking out native plants. Other bonuses of native plants are that they are likely to thrive in the conditions specific to your area and often require less supplemental watering while being more resistant to common pests.


    When picking native plants for your container garden, it’s up to your preference if you want use one or multiple plants per pot. A good rule of thumb if you want a variety of plants in one pot is to pick three plants with similar maintenance needs following the thriller, filler, spiller method.


    Thriller – a tall plant. When choosing a thriller, look for a plant that grows an appropriate height for your chosen planter and provides interesting textures, foliage and/or flowers to serve as your focal point. For most containers, you will want avoid plants that grow taller than 2ft.


    Filler – a plant that fills the pot. Fillers add mass to your container and are a fun option for playing with a new texture or foliage color. 


    Spiller – a plant that spills out over the edge of the pot. Finding a plant that will create some drama by draping over the side of your pot will create the final layer for your perfect container garden combination. 


    Native plants are often sold at garden centers, and many states have a native plant society or organization with lots of resources to help you plant a more environmentally friendly garden. The Lady Bird Johnson Wildflower Center has extensive lists to help you find plants native to your state as well as a Native Plants Database to help you identify and learn about native plants. The Audubon at Home program also provides a helpful resource on Captivating Containers with Native Plants that includes extensive information on container gardening with native plants as well as lists of plants and plant combinations that tend to succeed when planted in containers. 

    Butterflies on cone flower.

    2. Planting an eco-friendly container garden: pot size, soil and spacing

    Once you have identified a few native plants to use in your container garden, it’s time to pick out a pot for planting. While its easy to pick a container based on aesthetics alone, there are a few other important considerations. Make sure your pot has adequate drainage and is made of a material that works with your space. For example, concrete and ceramic planters can be heavy and difficult to move around while plastic and metal planters are long-lasting and lighter weight. If you like the look of one plant per pot, grouping multiple smaller pots together can have a very pleasing effect, as seen in this example from @simplysoutherncottage. Just be aware that smaller pots often require more frequent watering. If you decided to follow the thriller, filler, spiller method, pick a big container that will give your plants ample space and minimize the need for frequent watering.


    It is important to choose the right potting material for your front porch planter. Container gardening is unique in that your plants are confined to a closed system; they can’t send roots out to find nutrients or water. Look for a potting mix that drains easily while still retaining moisture – this will allow adequate air supply to plant roots and prevent the soil from becoming too densely compacted over time. Depending on the size of your pot, you may want to add a layer of gravel at the bottom to help maintain drainage and prevent soil from washing out when you water. 


    When filling your pot with soil, leave at least an inch of space between the top line of the soil and the top of the pot – this provides a shallow well that helps make watering easier. Space plants evenly with your thriller plant at the back so that it doesn’t block your filler and spiller plants in the front. Once planted, make sure all roots are covered with a thin layer of soil so that they can retain moisture. Now that your container garden is planted, you can enjoy watching each plant fill out space in the pot and begin to thrive!

    Front porch of white home with wood front door and potted ferns.

    3. Maintaining your front porch container garden

    Watering is a necessary task for keeping your container garden healthy. How much and how frequently to water will depend on your plant selection and weather conditions. If your planters aren’t under a porch, they will get rain and require less supplemental watering. Keep an eye on your plants during particularly dry, hot and windy days as water will evaporate faster in such conditions. To check if your container needs water, dig with your finger to see if there is moisture an inch or two beneath the surface. If it is dry a few inches down, that is a good sign to go ahead and water. When watering, fully soak the soil – you want to avoid having the soil wet at the top of the pot and dry at the bottom. Water until a trickle of water just starts from the drainage holes – make sure to stop at this point to avoid flushing nutrients out of the soil. 


    Most often, native plants do not require fertilizer, but if your plants start to wilt and yellow even with appropriate watering, temperature and light conditions, you may want to carefully use a fertilizer to ensure your plants have all the nutrients they need.


    As your plants mature, pick off dead foliage and trim faster growing plants so they do not overwhelm the space. Trimming plants so that they don’t run into each other will help maintain a clean aesthetic and definition. This also helps plants stay full and healthy. To maximize the positive impact your container garden has on the environment, leave spent flowers so that birds have a chance to gather remaining seeds (don’t deadhead).


    If you planted native perennials, you have the joy of a container garden that will return year after year. How to over winter your container garden will depend on the conditions of your climate. Because native perennials are perfectly suited for your region, most of the time they are hearty enough to withstand the coldest seasons you encounter. In abnormally cold or harsh conditions, shelter your container garden by insulating it with blankets or a thick layer of leaves behind a wind shield (moving your pot next to a south wall is usually easiest) or simply move your containers into a garage or shed where they will be out of the worst conditions. Once the weather returns to averages for the season, you can move pots back to their home base so they are ready to come alive in the spring.

    Hopefully these quick tips help you refresh your porch into a space that feels more beautiful and welcoming than ever – and all while helping support the health of the environment! For more fun front door refresh ideas and all things home DIY and design, make sure to check out our blog, Instagram and Pinterest


    Home office ideas for a productive, relaxing workspace.

    April 24, 2023 by emily.bailey

    Monday, April 24, 2023

    Home office in closet | Schlage

    Here are a few ideas for where you can create a home office and the items you’ll need to stay productive while you work your way through coronavirus and social distancing.


    READ MORE

    Are you excited when you get to work from home or worried about what it’s going to do to your productivity? Some of us see it as the perfect opportunity to wear sweatpants. All. Day. Long. Others not so much.


    Whichever camp you fall in, you might be wondering where you’re going to get your work done if you don’t have a dedicated office. Or, if you have kids at home during the workday, you’re trying to figure out how to maintain productive boundaries. Below are a few home office ideas for where you can create a work zone and the items you’ll need to get work done when remote. 

    Light and bright creative home office space.

    Small spaces for your home office

    When you don’t have an extra room to dedicate to a home office, you might need to get a bit creative. Look for small hideaways that will give you the workspace and privacy you need to stay on top of business.


    • Under the stairs: You never knew what to do with that awkward, empty space anyway. Now’s your chance to turn it into the nook of your dreams. If it feels claustrophobic to you, reserve that space for the kids’ homework zone.
    • Under a window: This is ideal if your window sill is at just the right height. Add a plank or something similar to give yourself a larger surface to work on. This setup also has the bonus of extra natural lighting.
    • In the kitchen: The 1990s loved these kitchen/office combos. Now might be a prime time to bring them back.
    • In the closet: We gave this tip for creating a family command center, but it’s equally effective in this situation. If you or your kiddos struggle with distractions, this might be a nice tucked-away option to help stay focused.
    • In a corner: Do you have a room with a random house plant jammed in the corner? Test it out as an office by adding a small table and chair. It’s not fancy and it might not be ideal for the long-term, but you never know until you try.

    Large spaces

    If you’re lucky enough to have more square footage, you have more flexibility. Try these home office ideas if you need to share workspace with a partner or the kids.


    Bedroom office with Schlage Custom door lever
    • Long wall: Line up a couple tables or pull out the buffet you only use for your Super Bowl party. A long and sleek desk can look chic and is ideal if there’s more than one of you trying to get work done at home.
    • Shed: Get out of the house without breaking quarantine by setting up a work station in the backyard. Maybe it’s a she-shed. Maybe it’s the garage. A little extra space and privacy might do everyone some good.

    Storage spaces

    Especially if your new desk doesn’t have drawers or you’re missing the filing cabinet you have at work, you might need to find some alternative storage solutions. Repurposing items from other areas in the house is a handy option when you can’t get out to buy organizers.


    • Overhead shelving: Consider hanging floating shelves. If you’re looking for a bigger DIY project – off the clock, of course – hang crates or boxes for effective storage and some visual interest.
    • Bar cart: Instead of beverages, you’ll have someplace to set your office supplies and files without taking up valuable space on your work surface. This is ideal if your new desk is more on the petite side.

    • Supply caddy: Your home abounds with items you can upcycle to corral your pens, paperclips, earbuds and post-its. It can be as simple as a drinking glass or a bit more elaborate with a spice rack. We think you’ll be surprised how many things from the kitchen in particular will work in your new office.

    Design productive kid spaces

    Do your kids struggle with staying on task? Are you trying to establish a new routine when they’re home from school? Try including some of these items in their “workroom” to keep it fun and functional.


    • Calendar: Help your kids stay on task with a DIY calendar. It could be sticky notes on a board, like HGTV shows us. Or you could turn a picture frame into a DIY dry-erase board. List their chores for the day or an hour-by-hour breakdown of what they should be working on.
    • Small desk: Their paperwork might be more about finger painting or practicing arithmetic, but they’ll need a worktop, too. If you want a pint-sized option just for them, you could try a wall-mounted desk. Place it in their bedroom and it could grow with them as a vanity or trophy shelf with time.
    • Display area: Just because their teacher isn’t there to admire their work doesn’t mean it has to go ignored. Devise a clip or hanger system or clear off some fridge space to show off their effort.
    • Organizers: Do they have work they need to turn in later? Keep track of their finished assignments with bins, file folders or any other number of hacks that will help corral their hard work and keep them from asking, “Mom, have you seen my …?!”

    Make it a space you love to work in

    No matter what kind of space you have, consider these home office hacks for making it more comfortable and yourself more productive.


    • Lighting: You don’t need to illuminate your entire “office.” Task lighting will make it easier to complete whatever project you’re working on at the moment. If you have a window in your new office space, take advantage of the natural light to ease the strain on your eyes and your nerves.

    • Comfy chair: It doesn’t have to be a traditional desk chair. It could come from the dining room or be the stool from your vanity as long as it’s comfortable.

    • Binder clip cord organizer: Laptops, phones and lamps all need to be plugged in or charged at some point. Keep the cords under control with this hack from Wired.

    • Something pretty: If you’re stuck inside for extended periods of time, it’s nice to surround yourself with things that make you happy. Artwork, plants, family photos or vacation souvenirs can help lift your mood. Just don’t go overboard and make your space feel cluttered.

    • Privacy screen: If your new office doesn’t have a door but you still need some peace and quiet, use a screen or move a tall bookcase near your desk to create some separation between you and the rest of the house.

    Design a secure home office

    Working from home doesn’t mean throwing security out the window. After all, your work computer houses sensitive information, not to mention the value of your home office technology itself. And if you have physical assets from work or confidential papers, you can’t risk those being visible to unauthorized eyes or getting ruined on accident by your child. Try these home office security ideas to protect your peace of mind.


    • Always log off your devices when you aren’t actively using them.

    • Protect your desk and work area as a no-kid zone.

    • Make sure valuable work assets are only accessible behind a lock.

    • Use strong passwords – utilizing a password manager can be a big help.


    The easiest way to protect your home office is with a Schlage Encode™ Smart WiFi Lever. You can quickly install this smart lever on any residential door with a knob or lever – making your guest room turned home office more secure than ever. Seamlessly control and monitor your lock through the Schlage Home App on your smart phone, so you don’t have to sacrifice keyless access to give your home office premium security.

    Do you have tips for creating an at-home office or improving your productivity while working from home? Share with us on Facebook and Twitter. And if you’re looking for some project ideas to keep yourself or your kids busy, check out the Schlage blog.


    8 DIY front porch ideas you'll love all season.

    April 18, 2023 by emily.bailey

    Tuesday, April 18, 2023

    Front porch ideas | Schlage

    Want to boost your home's curb appeal without a full-on remodel? Give your abode a face-lift with these eight striking front porch decorating ideas.


    READ MORE

    The front porch is the first thing your guests see, so make sure it leaves a good impression. Whether you have a massive, wraparound porch or a modest stoop, a few pieces of stylish décor can make a big difference. Fortunately, a porch is one of the easiest parts of the home to redecorate. Try one or more of these awesome design ideas to upgrade your front porch.
    White bungalow modern farmhouse front porch ideas with coastal blue front door.

    1. Install distinctive lighting

    If your home still has its basic, builder-grade lights, consider swapping out your fixtures. A unique light fixture can add style to an otherwise ordinary porch. As this post from @homebykmb shows, new lighting fixtures add an extra touch of class. If you don't want to make any permanent changes to your property, there are many other ways to use lighting. Consider wrapping string lights around your railing or setting a few lanterns on the steps to add a welcoming glow.
     

    2. Create a cozy spot to sit

    Adding some seating to your front porch increases its style and functionality. To create a sitting area that suits your home, carefully consider its size and shape. For example, West & Co. highlights a petite nook with a slim bench. Meanwhile, HistoricalConcepts shows how to style multiple seating arrangements on a big patio. Group furniture into conversation corners and eating areas so that all the different pieces come together to create a cohesive whole. And don't forget that your outdoor seating can be an ideal spot for a bit of whimsy. Addison's Wonderland uses a combination of rattan swings and knit poufs to create a fun, bohemian porch, and I Spy DIY added a sturdy yet comfy bench accented by a potted plant.
     

    3. Spruce up your flooring

    Most home entryways use simple wood boards or concrete for the porch flooring. To add visual interest, think outside the box. Instead of a solid, neutral floor, pick something colorful or patterned. We love this stenciled flooring done by @BerryBerryQuiteContrary. It looks completely unique and helps tie together all the other décor on the veranda. Stenciling is a great way to refresh your flooring because it's very affordable. With just a little paint, a basic stencil, and some elbow grease, you can create an eye-catching design.


    If your front porch budget allows, consider overhauling the flooring altogether. This brick front porch from @forever.six.acres provides the right touch of character that will last for decades no matter your style. 

    4. Bring greenery onto your porch

    When looking for front porch ideas, think carefully about plant placement. You don't have to leave all your shrubs and flowers in the flowerbed. Some well-placed planters are an easy way to upgrade your style. Soft fern fronds in a basket make this front porch by @lizlovegrowswild especially welcoming. If you don't have a green thumb, try some alternatives. Lately, we've seen a lot of gorgeous faux greenery styles that look just as good as the real thing. Or consider accentuating simple succulent plants with a fresh coat of paint on the front door like this makeover from @marlaplainandsmall.
     

    Shop Schlage Touch Keyless Touchscreen Deadbolt with Century trim

    5. Add decorative accents

    The best part of decorating the front of your home is creating a space that displays your unique style. Once you have the basics like some organized furniture and nice potted plants, start looking for opportunities to add a few extra decorative accents. Think about what makes your home unique, and consider ways to incorporate those touches into your porch. For example, Atta Girl Says has an adorable lemon theme to celebrate her love of this tart fruit. You can also use your outdoor space to display some of your favorite collections. MGM Builders added vintage objects like a weathered trunk and a galvanized metal watering can to complete a farmhouse look.


    And if you just so happen to have a vintage Schlage handleset, embrace it! @solomonbergdesign paired the perfect shade of green with this antique brass front door handle. Even if you don't have beautiful vintage hardware, you can still add a personalized finishing touch with Schlage Custom™ hardware

    6. DIY some architectural details

    Porches have the potential for some intriguing details. Unlike interior rooms, entryways typically have rails, columns, brackets, and other interesting elements. To get the right type of trim for your home, first consider its architectural style. For example, this revamped porch by Jenna Sue Design Co. features wood railings and bold color contrasts to modernize the exterior. These projects take a little more time than just unpacking some furniture, but they really enhance your home's "wow factor."
     

    7. Lay down a beautiful rug

    Consider adding an attractive rug, especially if your patio has furniture. A rug helps to clearly define separate spaces on your porch. It's also a great way to provide visual interest and make the area look more cozy and cohesive. As this post from @simplysoutherncottage shows, a rug is a great way to add a touch of softness to an area with a lot of concrete. Outdoor rugs often use special coatings that help them withstand the elements while still looking like traditional indoor carpets.

    8. Upgrade your front door handle

    Showcase your style with gorgeous door hardware. This simple switch turns a standard door into the highlight of your porch. Swapping out your door hardware offers a great opportunity to tie together all the design elements of your entryway. We love how @EverdayGraceDesigns used the sleek Schlage Addison handleset to complement the other matte black accents on the porch. You can also use your door hardware to switch up the overall style of your front porch. Tiffany from @caldtothefarm used this Schlage handleset to match the farmhouse vibes on her porch.
     

    Following these tips helps you get a front porch that looks welcoming, stylish, and appealing. If you're ready to get more awesome ideas for front porch decorating, seasonal décor ideas, and affordable DIY projects, check out more from the Schlage blog.


    Door hinge buying guide: How to find replacement hinges.

    February 22, 2023 by emily.bailey

    Wednesday, February 22, 2023

    door hinge | Schlage

    If your door hinges show signs of wear and tear, it might be time to replace them. Learn how to choose the best type of hinge for your door.


    READ MORE

    When it comes to door hardware, hinges are unsung heroes. We tend to forget about them until a door has trouble opening or closing. Luckily, replacing hinges is a straightforward process that requires only a few simple steps. But before diving into the installation process, you'll need to choose the right hinges. 


    This handy guide will walk you through everything you need to know to choose the right replacement door hinge. With a few simple tools and a little know-how, you'll have your door looking and working like new in no time.

    Woman opening bathroom door with black Schlage door hinges.

    When should door hinges be replaced?

    The average door hinge should last 10-15 years. One of the best ways to prolong the life of your hinges is to periodically lubricate them with WD40. However, this won't completely protect from factors such as wear and tear or a heavy door. Here are a few signs that it could be time to replace your door hinges:


    • Your doors are sagging or drooping
    • Your doors are hard to open and close
    • Your hinges are squeaking
    • Your hinges are loose
    • There is visible damage to your hinges

    Consider the corner style

    Schlage door hinges come in one of three corner hinge styles: 1/4" radius, 5/8" radius, and square. These styles refer to the shape of the hinge when it's viewed from the side. Most homes will have either round 1/4" radius or square corner hinges, but it's not uncommon to find homes with 5/8" radius corners.


    To determine the corner style of your hinges, take a look at their outer corners. If the corner is at a 90-degree angle, it's a square corner hinge. If the corner is rounded, it's either a 1/4" radius or a 5/8" radius. A 1/4" radius corner will fit a dime along the curve, and a 5/8" radius will fit a quarter.


    You can also refer to your existing hinges when choosing replacements. To make the installation go as easily as possible, choose the same corner style as the existing hinges on your door. Be sure to transfer the corners and screw holes for a complete look.

    Choose your finish

    Hinges are available in a variety of finishes to match any décor. The finish is applied to the metal of the hinge, so it will be visible when the door is open. While it may seem like a minor detail, the style and finish of your hinges can really help tie your whole home together.


    Consider your existing door locks, levers, knobs, and other hardware found in the home. While you don’t need all the metal hardware throughout your house to match, it is standard to match the finish of hinges with your existing door hardware. Some popular finishes for door hinges include:


    • Bright Chrome
    • Satin Nickel
    • Aged Bronze
    • Satin Brass
    • Matte Black


    At Schlage, we carry a variety of popular finishes to match any décor. Browse through our hinges and other door hardware accessories to find what you need.

    Door hinges - Schlage

    Select the right size

    Once you have chosen your finish, you'll need to measure your existing hinges to determine the correct size.


    In most homes, interior doors will use 3.5" hinges, while exterior door hinges will typically be 4" to support the additional weight of the door.

    How to measure door hinges

    To accurately measure your door hinges, you'll need a measuring tape and a few minutes.


    • Start by removing one of your door's existing hinges.

    • With the hinge removed, use a measuring tape to measure the width and height of the hinge. Be sure to write down these measurements or take a picture for reference.

    • Now, measure the distance between the top and bottom of the hinge's "knuckle." This is the part of the hinge that connects the two leaves. This measurement will help you determine the correct "length" of the hinge.

    • Finally, measure the thickness of your door. Most interior doors are 1 3/8" thick, while exterior doors are 1 3/4" to 2" thick. Be sure to choose a hinge with the correct door thickness for your project.


    Another simple way to choose a replacement hinge is to take an existing hinge with you to the store. You can also transfer the pattern of the hinge onto a piece of paper using a pencil. However, if you are buying online, simply knowing the size and corner style is usually enough.

    If you’re looking to update your home with simple DIYs that improve both the functionality and style of your home, check out the Schlage blog and follow us on Instagram and Pinterest. We’re always adding new project ideas and how-to tips for home improvement!