07

Blog

Your browser is out of date

This website will not look or function as originally intended in your current browser

We recommend upgrading to the latest version of Internet Explorer or Chrome or Firefox

    Let freedom ring: 6 front porch decor ideas to celebrate the 4th of July.

    June 18, 2020 2:15 PM by emily.bailey

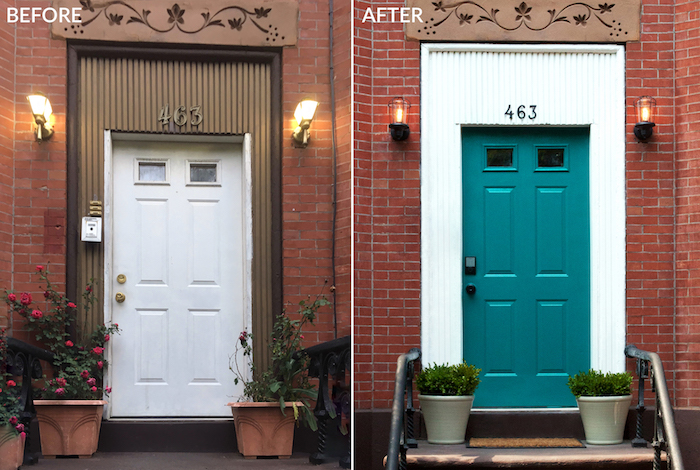
    Thursday, June 18, 2020

    5 Front Porch Decor Ideas to Celebrate the 4th of July

    Don't let the 4th of July pass by without a patriotic display on your front porch. Here are six simple patriotic front porch decor ideas you should try.


    READ MORE

    It's hard to believe the 4th of July weekend is upon us. You may be feeling like the summer is flying by and when that happens, the holidays have a way of sneaking up on you. If you haven't thought about how you're going to celebrate yet, we put together six easy ideas for making sure your front porch is looking the part and ready to celebrate in style.

    1. Keep it simple

    Keep your existing front porch decor and simply add an American flag or two for a patriotic look that's quick and easy to pull off. Ann from On Sutton Place does just that with a cute display on her existing wreath.

    2. Hang some bunting

    Bunting is incredibly versatile and always gorgeous for celebrations. It can be made out of nearly anything – flags, bandanas, paper, fabric scraps – and you can find it at most stores this time of year or make your own by sewing, stapling or simply tying your materials together. Take the understated classy route like Boxwood Avenue with flags made of painters’ cloth. Or make a bigger statement like Nora Murphy.

    3. Plant patriotic flowers

    Whether you opt for red, white, blue or a combination of the three, fresh flowers are a great way to add a pop of patriotic color to your front porch. Consider refreshing your planters or adding to existing arrangements to get your front porch ready to celebrate the long weekend in no time. Here's some inspiration from On Blueberry Hill.

    If you’re someone who thinks subtle holiday décor is for the timid, DIY some patriotic planters for those flowers. Lolly Jane quickly transformed some common terra cotta pots with a bit of paint and creativity for an extra celebratory kick.

    4. Try a DIY project

    The long holiday weekend is the perfect time to put your skills to the test and try out a new craft. Homeowners with kids can even get them involved and create something adorable to celebrate the 4th of July. This patriotic wreath from Home Crafts by Ali is the perfect place to start.

    5. Get creative

    Take some inspiration from the holiday itself and create something unique for your porch decor. Here's how Hoosier Homemade took a few wooden fence posts and made them into wooden firecrackers, perfect for any 4th of July-inspired space!

    6. Spare no detail

    Of course, we love when each and every detail is carefully curated to complete a look. You’ll definitely be tempted to hang out all weekend on this patriotic patio by Four Generations One Roof. Grab a few red, white and blue pillows, blankets and accessories and create a space where you can enjoy some relaxation and good company.

    Are you planning on decorating your home for the 4th of July weekend? Be sure to share your photos with us on Facebook and Instagram!


    4 approaches to stunning front door makeovers

    July 25, 2016 9:09 AM by emily.bailey

    Monday, July 25, 2016

    4 Approaches to Stunning Front Door Makeovers | Schlage

    The front door is your best chance to make a great first impression. Make the most of it with inspiration from one of these four front door makeovers.


    READ MORE

    The front door is your best chance to make a great first impression. Don't let this part of your home be an area of neglect that distracts from the work you've done to express your personal style. Here are four different approaches to front door makeovers a few of our favorite designers and bloggers have taken to give their curb appeal a much needed boost.
    It doesn't take much to create a showstopping front door look when starting with a blank slate like interior designer, Nicole Gibbons, did with this Brooklyn Brownstone. With a splash of color and a hardware upgrade, this front door instantly transforms from uninviting to eye-catching and welcoming. Get all the details on the inspiration for this look at her blog.
    4 Approaches to Stunning Front Door Makeovers | Schlage
    When Carmel of Our Fifth House decided to give her curb appeal a little attention, she knew it was the smallest of details that could make the biggest impact. With a front door painted in a gorgeous shade of pink, her outdated, worn out handleset was doing her no favors. By simply swapping her handleset for a style that better suited her home, Carmel added the perfect balance of modern design to her traditional home. We're loving how well the Century handleset complements the pink door and front porch accessories. See the full reveal and get tips for installation at Our Fifth House.
    4 Approaches to Stunning Front Door Makeovers | Schlage
    When it comes to first impressions, your home's curb appeal counts. That's how Jen of with HEART felt about her latest renovation. With a focus on mid-century design on the interior of the home, the quirky exterior needed a full overhaul to complement the clean design inside. See the impressive transformation and get the details on each accessory.
    4 Approaches to Stunning Front Door Makeovers | Schlage
    When thinking about how to upgrade your curb appeal, it helps to follow a framework for good design to avoid getting overwhelmed. That's exactly how Kim of Sand & Sisal approached her latest front door makeover and she's sharing her secrets for success over on her blog. Take a look at all of her transformations over the years and hear her tips to inspire your next curb appeal project.
    4 Approaches to Stunning Front Door Makeovers | Schlage

    Which tranformation is your favorite? Comment below to let us know!


    Why keyless locks are perfect for families on the go

    July 20, 2016 10:02 AM by emily.bailey

    Wednesday, July 20, 2016

    Why Keyless Locks are Perfect for Families on the Go

    Stop worrying about getting locked out or kids arriving home safely. Here are 5 reasons why keyless electronic locks are perfect for your busy family.
     

    READ MORE

    With back to school season just around the corner, many families are gearing up for busy schedules full of homework and extracurricular activities. With all the different calendars you need to keep track of, it pays to stay organized and find efficiencies that allow you to reduce the number of things you need to worry about. Here are a few reasons why keyless locks are perfect for your busy family.
    Keyless locks - Families - Schlage

    1. Peace of mind

    When you install a smart electronic deadbolt, you reduce the worry that your home is left unlocked after rushing out the door. With remote capabilities enabled, you can check the status of your door no matter where you are. If unlocked, you can even command it to lock. You can also set up notifications to receive alerts when your kids arrive home.

    2. No more lost keys

    Installing a keyless lock means you can ditch the mechanical key altogether. Choose a single code for the whole family or assign a custom code for each member that is easy to remember. Now when your kids head off to school, you don't have to worry about them losing the key or someone finding the hidden spare.

    3. Auto-lock

    How many times have you rushed out the door, making sure each child was accounted for and had all their essentials only to forget to lock the door when you leave? Or how many times have one of your kids headed out to catch the bus and failed to lock the door behind them? That's where the auto-lock feature that comes with the Schlage Sense™ Smart Deadbolt and Schlage Connect™ Touchscreen Deadbolt comes in handy. You can program your deadbolt to automatically lock after being left unlocked for a certain period of time.

    4. Easy access

    Whether you have a sleeping child in tow or an arm full of groceries and backpacks, keyless locks make it easy to unlock your door by eliminating the need to juggle a set of keys. Simply enter your access code or talk to unlock (with the Schlage Sense lock).

    5. Convenience

    There's already enough to juggle with remembering which child needs to be at which practice at which time. Say goodbye to the days of calling a locksmith to re-key your locks or let you in to your home after you've been locked out. With keyless deadbolt locks, you don't have to be weighed down by your keys anymore and know that you and your family can come and go with ease.

    Have questions about which keyless lock is right for you and your family? Comment below and we'll help you sort through the features and benefits.


    5 easy ideas for a more organized and secure garage

    July 11, 2016 10:30 PM by emily.bailey

    Monday, July 11, 2016

    5 Easy Ideas for a More Organized and Secure Garage

    Enjoy a more carefree summer by building an organized and secure garage space. Check out these 5 easy garage security and storage solution ideas.


    READ MORE

    Now that summer is in full swing and schedules are filling up from kid's activities and vacations to home improvement projects and social gatherings, it's a great time to make sure your home is organized, secure and ready to handle whatever the season throws its way. For many, the garage can be a source of stress as tools and toys are in disarray or even anxiety over forgetting to close the garage door. Here are a few of our favorite organization and security tips that you can incorporate in no time and enjoy a worry-free summer.


    1. Avoid leaning items against the wall

    When it comes to storing rakes, shovels, brooms and more, it's easy to lean these items against the wall and walk away. It becomes a pain when one wrong move causes a domino effect and they all come crashing down. Assign a designated, secure location for each of these items by hanging hooks or try this DIY storage solution using old pallets. Get the full tutorial from HomeTalk.

    2. Create a workspace

    If you're the type of homeowner that likes to create and build things, then an exterior workspace is a definite need for you. Unfortunately, many homeowners tend to store way too much in the garage, making valuable real estate for working hard to come by. That's why we love this idea from Home-Dzine for a worktable that easily folds down to make room for vehicles or anything else you need to store when the workspace is not in use. Check out how simple it is to build your own fold-down worktable with this complete tutorial that saves time and money by recycling an old hollow-core door.

    3. Place barely used items out of sight

    Remove the stress of digging through piles of unused items looking for the one you actually need by keeping this clutter out of sight. Use the space near the ceiling in your garage to build shelving and store these items in bins. Take it another step and include a label to tell you what's inside without having to remove the bin to find out. We're big fans of this suspended shelving idea from The Family Handyman.

    4. Keep toys and sporting equipment organized

    Scrambling to find the kid's sports gear while running late to practice is a scene many parents know too well. Create a designated space for these items to help reduce the likelihood they could be misplaced and avoid having toys and gear strewn about. If your garage has exposed studs, use them to your advantage like Wendy of Designed to Dwell and create this easy storage system for gear and toys.

    5. Upgrade your garage security

    How many times have you left the house and wondered if you remembered to close the garage door? Even worse, you also forgot to lock the door leading from the interior of your home. With a smart garage device, you can check the status of the garage door and even command it to close remotely. Take security up another notch by installing a keyless electronic lock. This will ensure you and the kids will always have easy access but with features like auto-lock or even smart solutions, you can rest easy knowing your door is always locked.
    5 Easy Ideas for a More Organized and Secure Garage | Schlage


    What other storage solutions or security tips do you have for the garage? Show us your projects on Facebook and Instagram!


    How to install a handleset on your front door

    July 6, 2016 2:56 PM by emily.bailey

    Wednesday, July 6, 2016

    How to Install A Handleset on Your Front Door | Schlage

    Here is a detailed breakdown with photos of the steps you'll need to take to install a new Schlage handleset on your front door.


    READ MORE

    Updating the door hardware on your front door is a quick and easy project that enhances the curb appeal of your home. With minimal investment and few tools, we'll show you all the steps you'll need to take to tackle this project in a few minutes. Go ahead and grab your #2 Phillips Head screwdriver and tape measure and learn how to install a new handleset on your front door below. Be sure to review the deadbolt installation steps first if you'll be installing a new deadbolt as well.

    Handleset Parts Checklist

    Once you've gathered your tools, make sure all the parts of your handleset are accounted for. This step will ensure that the installation process goes as smoothly as possible. Here's a checklist and photo to help:
    Curb appeal - Handleset Installation - Schlage
     Outside handle assembly: This is the exterior grip of your handleset.
     Inside lever: This is the lever that will be on the interior side of the door. You can also choose a handleset with knob on interior side instead.
     Strike plate: The strike plate is the metal plate that will be affixed to the door frame.
     Latch: The latch is a spring operated bolt with a beveled face to permit a latching action when the door closes
     Round drive-in faceplate: This is an optional faceplate that may replace the rectangular faceplate already attached to the latch if your door calls for it.
     Pin tool
     Screw cover, screw and washer: These will be placed on the interior side of the throughbolt hole to secure the bottom of the handleset.
     Short screws: These will be used to secure the latch in place. 
     Long screws

    Measurement Checklist

    You'll also want to be sure your door meets standard door prep measurements and is properly aligned to ensure your handleset operates as intended. You'll first want to follow the measurement steps we showed you for the deadbolt installation but for a handleset, there are a couple more measurements you'll need to pay attention to.
     Throughbolt
    - The throughbolt hole is for the bottom of the outside handle assembly. This hole needs to be 3/8" in diameter.
    How to Install A Handleset on Your Front Door | Schlage
     Handleset Crossbore
    - The handleset crossbore is the bottom bore opening on a standard drilled door. It should measure 8 1/2" from the center of the handleset crossbore to the throughbolt.
    How to Install A Handleset on Your Front Door | Schlage
     Doorjamb
    - The hole in the doorjamb should measure at least 7/8" in diameter and a minimum of a 1/2" deep.
    How to Install A Handleset on Your Front Door | Schlage

    Handleset Installation Instructions

    1. You'll begin installing your handleset by placing the latch first.*
    How to Install A Handleset on Your Front Door | Schlage
    *The latch comes with a pre-attached rectangular faceplate. If your door calls for a round drive-in faceplate, complete steps a-c before proceeding. You'll also need to add a flat head screwdriver, hammer and block of wood to your tool set.

    a. Remove faceplate with a flat head screwdriver


    b. Twist and remove remaining support plate


    c. Install round drive-in faceplate with just a snap

    2. If you're using the rectangular faceplate, simply slide the latch into place with the bevel facing the doorjamb and secure with the two short screws.
    How to Install A Handleset on Your Front Door | Schlage
    If you're using the round drive-in faceplate, slide the latch into the hole with the bevel facing the doorjamb. Gently tap into place until flush with the door edge, using a small block of wood to protect the latch.
    How to Install A Handleset on Your Front Door | Schlage
    3. Next, you'll install the outside handle assembly. Align the spindle on the back of the assembly with the throughbolt and the slot in the latch. Slide the adjustable throughbolt up or down as needed and press the handleset onto the door. The handle will stay in place leaving your hands free to secure the interior trim.
    How to Install A Handleset on Your Front Door | Schlage
    How to Install A Handleset on Your Front Door | Schlage
    4. Begin installing the inside lever by orienting the lever to point away from the edge of the door with the screw holes aligned vertically.
    How to Install A Handleset on Your Front Door | Schlage
    5. Align the square spindle with the square hole on the back of the lever and secure with the two screws provided.
    How to Install A Handleset on Your Front Door | Schlage
    How to Install A Handleset on Your Front Door | Schlage
    6. Now you're ready to place the washer, screw and screw cover to secure the bottom of the handleset.
    How to Install A Handleset on Your Front Door | Schlage
    How to Install A Handleset on Your Front Door | Schlage
    7. Finally, install the strike plate on the doorjamb using the last two small screws.
    How to Install A Handleset on Your Front Door | Schlage

    For even more detailed steps to installing your new handleset, be sure to watch the installation video.